There’s nothing more irritating than the clicking noise of a dead battery while trying to start your car. Thankfully, vehicle jump-starts are easy to perform if proper procedures are followed. Jump cable order is essential, both for personal safety and the vehicle’s electrical systems to avoid further damage.
This article explains the correct step-by-step procedure for connecting jumper cables with an emphasis on safety. By the end of this article, we hope every reader, regardless of experience level, comes away with useful knowledge that can be applied in real life.
Why Knowing the Correct Jumper Cable Order Matters
Before moving onto practical instructions, let’s first discuss why the sequence of connections matter. Car batteries hold large amounts of electric current, meaning short circuiting for jumper cables connected in the wrong sequence may occur due to improper connections. This type of error may result in temporary battery damage, dangerous sparks, and electric surges. In extreme scenarios, explosions are a potential risk
Today’s cars have complicated electronic systems. A misstep could damage delicate circuitry, which transforms something as effortless as a jump-start into an expensive endeavor. This is the reason why knowing the correct sequence becomes critical.
How to Jump-Start a Car Safely: Step-By-Step
Let’s break this down into simple steps.
1. Gather the Necessary Tools and Park Safely
- Make sure that you have a set of reliable jumper cables that are in working order.”
- Position the car that needs jumping as well as the vehicle that will do the jumping, either side by side or nose to nose so that both vehicles are close enough for the cables but not touching.
- Shut both vehicles off, set the parking brake, and open the hoods.
2. Identify Battery Terminals
Car batteries have two terminals:
- Positive (+): Usually marked with a red cover.
- Negative (-): Usually marked in black.
Inspect for corrosion or damage before proceeding.
Which Jumper Cable Goes On First? Correct Connection Sequence Explained
Here’s the exact order recommended by experts:
- Connect the red (positive) cable to the positive terminal of the dead battery.
This is the first cable you should attach. - Attach the other end of the red (positive) cable to the positive terminal of the good battery.
- Connect the black (negative) cable to the negative terminal of the good battery.
- Attach the other end of the black (negative) cable to an unpainted metal surface on the dead car’s engine block or frame — away from the battery.
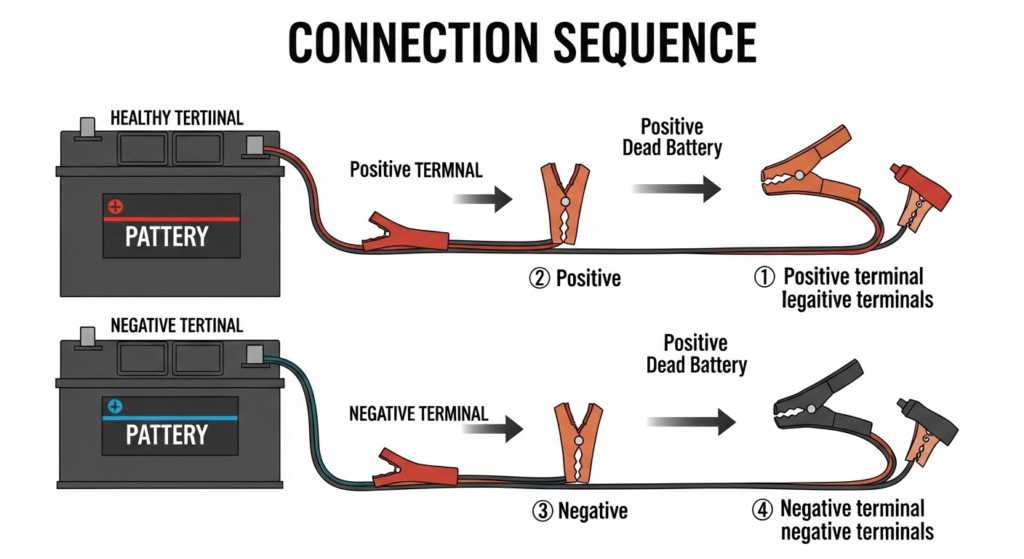
Attaching the final negative clamp to a grounded metal part instead of the battery helps prevent sparks near the battery, which can be dangerous.
Why Should the Positive Cable Go First?
The main reason for attaching the positive jumper first is for practical and reductive safety. If you were to connect the negative first, and then touch the positive to the cars metal frame interviewer, there sensational gaur saga electrical arc. By connecting the positive first, there is more control over current going through the system, creating less hazards.
Common Questions About Jumper Cable Order
Can You Put Jumper Cables on Backwards?
Yes, but I would not recommend it. Connecting cables in reverse would lead to other complications likeesu artery violation of the property rights of other sensitive components. It could blow some essential fuses, hurt the alternator, or ruin one modern electronic cars delicate circuits.
What Happens If You Connect Negative First?
Connecting the negative terminal first can create the hazardous possibility of short-circuiting if a wrench or cable touches the metal chassis of the vehicle while you’re still gripping the positive cable. This can cause sparks and create a dead short.
Best Practices for Using Jumper Cables
Knowing which jumper cable to put on first is not the only thing that matters in a jump start. I have listed more safety instructions below:
- Put on protective gloves and glasses to avoid injury from sparks or acid.
- Avoid leaning over the battery while the cables are being connected.
- Avoid smoking near the battery, as hydrogen gas may be present.
- Ensure that the cables remain clear of moving components such as fans or belts.
- After the jump, remove cables in the reverse order:
- Negative clamp from the grounded metal on the dead car.
- Negative clamp from the good battery.
- Positive clamp from the good battery.
- Positive clamp from the dead battery.
Prevent Dead Batteries with Simple Maintenance
Knowing the right steps to take when performing a jump-start is useful. However, knowing how to prevent the need for batteries failing is better.
- Regularly check for corrosion at the battery terminals.
- Ensure the battery is properly secured in place.
- Replace aging batteries before they fail to avoid issues.
- Drive the vehicle often to maintain the charge in the batteries.
- Always have a portable jump starter on hand for emergency situations.
Conclusion
Understanding the correct order for applying the cables can save you time as well as money, and even potential risk. You will be guaranteed a seamless and safe jump-start if you always connect the positive cable first and ground the negative clamp away from the battery. By adhering to the proper procedure, you help prevent unnecessary damage while saving money in the long run.
Help other motorists who may require a reminder of this simple yet vital technique by sharing this guide.
FAQs
Q1: How long should I leave the cables connected after starting the dead car?
Allow a minute or two to enable the dead battery to receive some charge. Afterward, once the ‘dead’ car is operating smoothly, disconnect the cables in reverse order of how you connected them.
Q2: Can I jump-start a car in the rain?
Yes, but caution is recommended. Make sure that the connections for the cables and the battery are not excessively wet or submerged. Also, do not stand in puddles when connecting anything electrical.
Q3: Do I need to rev the engine of the donor car?
It can assist. Light revving the functional vehicle’s engine can augment the alternator’s output, allowing for a more robust charge to be received by the dead battery.
Q4: Should I replace my jumper cables regularly?
Once a year is often a reasonable timeframe to inspect the cables. If the clamps are corroded or the wires are frayed, they need to be replaced immediately.
Q5: Is a portable jump starter safer than jumper cables?
Portable jump starters eliminate many risks associated with electrical errors. For solo drivers, they serve as an excellent additional resource.